
Blog
Insulation takeoff checklist: 12 checks before you send the quote
Most insulation quotes that go wrong don't go wrong in the maths. They go wrong in what was measured. Run through these twelve checks before the quote goes out.
An insulation takeoff looks simple: ceilings, walls, maybe a floor. The square metres are rarely the problem. The problems are the areas nobody measured, the R-value that changed between two sheets, and the wall height that was right for one level and wrong for the other. This is the list to run through before you price the job.
I quote insulation in Australia, so the examples use Australian terms and metric R-values. Where things are named differently elsewhere, the US, UK, New Zealand and Canadian versions are in brackets.
1. Work from the energy report, not only the plans
The floor plans tell you where the walls are. The energy report tells you what goes in them (in the US, the energy code compliance under the IECC, such as REScheck or a HERS rating; in the UK, the SAP calculation under Part L; in New Zealand, the Building Code clause H1 calculation; in Canada, NBC 9.36): the R-value for each ceiling, wall and floor, and any element that needs nothing at all. Read it first and write the R-values down for each element. If the report and the drawings disagree, ask before you quote, and put the question in writing.
A note on R-values: Australian and New Zealand R-values are metric. US R-values are about 5.7 times the number, so a metric R2.5 is roughly R-14. In the UK you’ll mostly see U-values and a thickness instead.
2. Make sure the building can take what the report asks for
The energy report is written before the frame goes up, and it assumes the building can hold the insulation it specifies. Check with the builder before you sign off. Most R2.5 wall batts are made for a 90 mm stud cavity (about a 2x4 wall in the US): if the frame is 70 mm, they won’t fit. Found early, a gap like this can often be fixed on paper: the energy assessor reworks the report to add R-value somewhere else, such as the ceiling, to make up for it. Found after you’ve quoted and signed off, it can become your problem to meet the spec, and the fix is often rigid board, which can cost more than seven times as much as batts to supply and install.
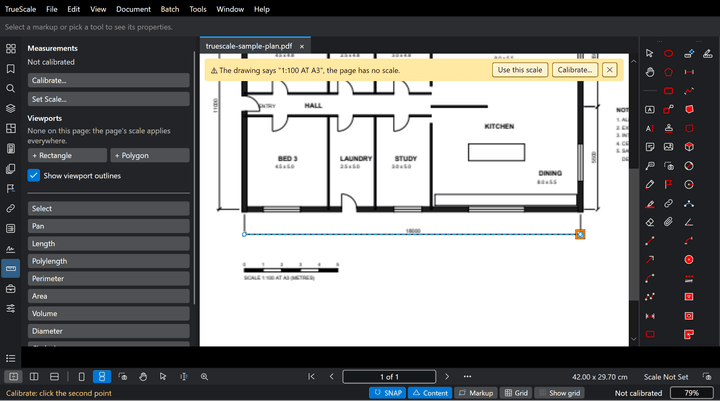
3. Check the scale before you measure anything
Measure one dimension that is written on the drawing, such as a room width or an overall length, and compare. A PDF printed or exported at the wrong paper size can be out by a few per cent, which is a few per cent of every area on the job. If the sheet has several viewports at different scales, check each one you measure on.
4. Ceilings: find every part of the ground floor that’s under roof
On a two storey house, the upper floor rarely sits exactly on top of the ground floor. Wherever the ground floor reaches past the floor above, usually around its perimeter, and in any single storey parts, that ceiling is under the roof and needs ceiling insulation just like the upper floor. Lay the upper floor outline over the ground floor plan to find these areas; they’re easy to miss. The rest of the ground floor ceiling sits under the upper floor. That’s the between floor, and it goes on its own line (see check 9). Measure each ceiling area by R-value, as the energy report calls it up.
5. Raked ceiling, or flat ceiling under a pitched roof?
This one catches people out. A pitched roof doesn’t mean a raked ceiling (a cathedral or vaulted ceiling in the US). If the plaster is flat with the roof pitched above it, the batts lie flat on top of the ceiling and you measure the plan area. If the ceiling is raked, with the plaster following the roof line to make the room feel bigger and grander, the insulation follows the slope: divide the plan area by the cosine of the pitch (about 1.08 times at 22.5 degrees, about 1.15 times at 30 degrees) and keep it on its own line, because it’s often a different product and a different labour rate. Check the sections and the ceiling notes, and ask the builder if the drawings aren’t clear.
6. Downlights: check the rating
Count the downlights (recessed lights or can lights in the US) in every insulated ceiling and check their rating on the electrical plan or schedule. IC-rated fittings can be covered with insulation (the same term in North America; in the UK, look for fittings rated to be covered). Fittings that aren’t rated need a clearance gap or a cover, which changes both the area you install and your materials list.
7. Walls: heights by level, gross or net the same way every time
Walls are drawn as lines and priced by the square metre, so every wall run needs a height. Upper floors often have lower ceilings than the ground floor. Use the height from the sections or the notes for each level, not one figure for the whole house.
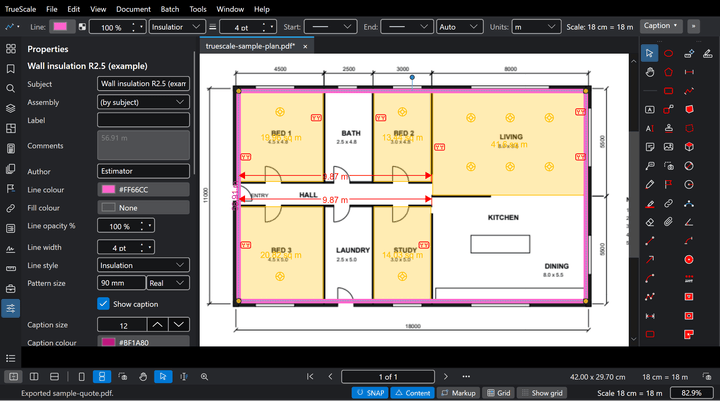
Decide whether you quote external walls before or after windows and doors, and do it the same way on every job. Gross areas are quicker and allow for offcuts around openings; net areas are closer to what goes in. Either is fine, as long as your rates were worked out on the same basis.
8. The walls that are easy to miss
Check the energy report for walls between the house and the garage, walls next to a roof space (dwarf walls and attic walls), gable ends above the ceiling line, and any internal walls marked for acoustic batts. These are usually short runs on the plans and easy to skip.
9. Cantilever, between floor and underfloor: three different lines
Floors that need insulation rarely stand out on a floor plan, so compare each floor’s outline with the floor below. Then split what you find into three lines, because each one is installed and priced differently:
- Cantilever: an upper floor that overhangs open air past the wall below. Measure it on its own and price it on its own line.
- Between floor: the ground floor ceiling where the upper floor sits over it, including over a garage, carport or other unheated room.
- Underfloor: a suspended ground floor over the subfloor (a crawl space in the US; a suspended timber floor in the UK). It’s the hardest to get to, usually installed from below, and the dearest of the three.
For each one, find out when you’ll be installing it. Before the floor sheets go down, you work from above and it’s quick. After, you’re working overhead from below, and the labour can be two to three times as much. Write which one you’ve priced into the quote, and allow for the other in case the timing slips.
10. Look at the frame before you lock in the install
On a new build, insulation goes in before the plaster, because it’s far quicker to install into an open frame. That means the frame has to be ready for it, and the drawings won’t always tell you whether it is. Two things to check:
- Spacing. Batts come in widths to suit the stud or rafter spacing. The plans might show 600 mm centres (24 in in the US), but the builder can switch to 450 mm (16 in in the US; 400 mm is common in the UK) late in the job. Confirm it, so the right width is on site.
- Support for the ceiling batts. Ceiling batts going in before the plaster need something to hold them up until it’s on, such as the builder’s ceiling battens. If there’s nothing there, you’ll need to string the ceiling (run support lines across the joists or rafters; netting or insulation supports in the US) to hold the batts in place, and that’s extra labour and material. Quote stringing where it applies.
Put both in writing in the quote, and pop past the site to see the frame for yourself before you lock in the install date. Ten minutes on site beats a day of surprises.
11. Wall wrap, sarking and other products on their own lines
Wall wrap, roof sarking (house wrap and roof underlay in the US; breather membrane in the UK), acoustic batts and rigid boards are different products at different rates. Measure them on their own lines so each one has its own total. A single “insulation” total hides the mix and makes it hard to check.
12. Turn square metres into packs
Batts are sold in packs that cover a set number of square metres (square feet in the US), and the pack size depends on the R-value, the width (for the stud or joist spacing) and the brand. Divide each total by its pack coverage, round up per product, and add your own allowance for offcuts. Do this per R-value, not on the combined area.
Price a job with no gaps
A good insulation job doesn’t have gaps. Batts should overlap where walls meet ceilings and fit snugly around every corner, junction and service, and that takes a little more material than the bare square metres. Allow for it in the quote. Given the choice, you’d always rather over-insulate than under-insulate: the extra material costs far less than a cold spot, a failed inspection or a callback. What separates a good outcome from a bad one is attention to detail. A good cup doesn’t leak; a bad one does.
Before you send it
Look at the marked up plan one more time with the totals beside it. Every room with a ceiling should have a ceiling area or a reason it doesn’t. Every external wall should have a run. If a number looks out of line with a similar job, find out why before the customer does.
TrueScale keeps each of these on its own tool, so ceilings, raked ceilings, walls by height and underfloor each total by R-value in the Markups List. The insulation page has a worked example on a set of townhouses.
Start free trial 30 days, every feature, no card